Starting a renovation can be very thrilling. However, after the noise of tools stops and the last piece of drywall is put up, there is one important task left: post-construction cleaning. This task is not just about picking up some mess. It means dealing with challenges like fine dust, construction waste, and leftover mess. This ensures your place is clean and ready to live in. This helpful post-construction cleaning checklist will walk you through every step, making sure your appliances are shining and your newly renovated space is set for its big reveal.
Understanding Post-Construction Cleaning

Post-construction cleaning is a special type of cleaning. It is about making a newly built or remodeled space clean and safe for people to live in. This kind of cleaning is different from regular cleaning. It deals with issues that come from construction or renovation work. These issues include fine dust, paint spots, glue leftovers, and other messes.
The cleaning usually happens in several steps. Each step targets different types of dirt. The process often begins with removing large trash. Then, they vacuum and dust all the surfaces. After that, they clean the windows and sanitize the bathrooms and kitchens. Sometimes, it even includes cleaning HVAC systems to help maintain good air quality. Knowing about post-construction cleaning is important. This knowledge can help you decide if you want to do it yourself or hire professionals for the job.
The Importance of Cleaning After Construction
A clean construction site is important for more than just looks. It also helps with health and safety. Plus, it makes your fixtures and appliances last longer. If construction dust is not cleaned well, it can be harmful to breathe in. It can also damage electronic devices.
Cleaning after construction is key for your new appliances to work well. Dust and debris can block filters, scratch surfaces, and cause problems over time.
When you invest in good post-construction cleaning, you make a space that is healthier and more welcoming. It also helps to protect your investment in your new or updated area.
Differentiating Between DIY and Professional Cleaning Services
Deciding if you should do post-construction cleaning yourself or hire professionals is not easy. It depends on a few things. Doing it yourself may save money, but it takes a lot of time and effort. You also need special cleaning tools. Think about these points:
- Project Size: Small jobs with very little mess can be done yourself. But big projects need special tools and more help.
- Cleaning Expertise: Professionals know how to deal with different cleaning problems. They can do a more complete and quick job.
- Time Constraints: If you do not have much time, hiring cleaners can help you finish faster.
In the end, check your cleaning checklist and budget. This will help you decide what is best for your needs.
Preparing for Post-Construction Cleaning

Before you start cleaning, it’s important to prepare. This will help you stay safe and work well. First, look at what needs to be cleaned. This will help you know what tools, supplies, and how much time you will need to finish the job.
Next, focus on safety. Gather protective items like gloves, goggles, and masks. These will protect you from dust and debris. Make sure the area has fresh air, and be careful with any dangerous materials. A well-prepared space will help you clean more smoothly and safely.
Essential Equipment and Supplies You Will Need
Having the right tools and supplies ready is very important for good post-construction cleaning. Here is a checklist of things you will need:
- Heavy-duty trash bags: These are needed to collect and throw away construction waste.
- Brooms, dustpans, and a heavy-duty vacuum cleaner: These tools help to clean dust and debris from floors and other areas.
- Microfiber cloths and mops: Choose microfiber cloths and mops because they are great at grabbing dust and dirt.
- Cleaning solutions: Get all-purpose cleaners, glass cleaners, floor cleaners, and disinfectants for different surfaces.
Also, it’s important to use the right cleaning products for the surfaces you are cleaning. For example, a pH-neutral cleaner works best on delicate surfaces like marble and natural stone.
Safety Measures and Precautions Before You Start
Safety must always come first during post-construction cleaning. Before you begin, take these important steps:
- Wear safety gear: Always use gloves, goggles, and a dust mask. This is key when you’re dealing with fine dust. Think about using a respirator for more protection.
- Make sure there is good air flow: Open windows and doors to let fresh air in. This helps stop fumes from cleaning products from building up. If needed, use fans to help with ventilation.
- Be careful with sharp objects: Construction waste can have nails, glass, and other sharp things. Wear thick gloves and throw these items away in strong containers.
By focusing on safety and following these steps, you make a safe working area and lower the chance of accidents.
A Beginner’s Guide to Post-Construction Cleaning
Post-construction cleaning can seem hard. But if you break it down into smaller steps, it becomes easier. This guide gives you a simple, step-by-step plan that you can use for most cleaning after construction or renovation projects.
Make sure to be careful and organized. Clean one area at a time. By using these steps and changing them to fit what you need, you can make your construction site clean and shiny.
Step 1: Removing Construction Debris and Dust
Start by making your space clear of large items. This includes leftover building materials, packaging, and any visible trash. Use strong trash bags to throw these things away. After you remove the big items, focus on getting rid of the dust.
Take a heavy-duty vacuum cleaner and vacuum all surfaces well. This means the floors, walls, ceilings, and any fixtures too. Pay special attention to corners, gaps, and spots where dust likes to gather. Keep in mind that fine construction dust can land on surfaces even after the work is done.
Cleaning away dust regularly will stop it from spreading back to clean areas. It’s also important to wear a mask or respirator to protect yourself from breathing in the dust during this step.
Step 2: Deep Cleaning Surfaces and Floors
Once you remove most of the debris and dust, it’s time to clean. Start at the top and go down. Clean the ceilings, walls, and baseboards first. Use a mild all-purpose cleaner with a microfiber cloth or sponge. If there are tough stains, think about a cleaner made for that specific surface.
Next, focus on the floors. Use the right method and cleaner for your type of flooring. For tiled floors, you might need to scrub with a special cleaner. For hardwood floors, use a gentle cleaner meant for wood.
Always try the cleaner on a small, hidden spot first. This way, you can check if it harms the flooring. Let the floors dry completely before you move to the next step.
Step 3: Sanitizing Bathrooms and Kitchens
Bathrooms and kitchens need extra care when you clean after construction. These places can gather a lot of germs. First, use a multi-purpose cleaner to wipe down all surfaces like countertops, sinks, and backsplashes.
Next, spray all surfaces, especially the ones that people touch often. Use a disinfectant cleaner for doorknobs, faucets, light switches, and toilet seats.
Lastly, clean the floors using a cleaner that matches the type of flooring you have. Make sure to keep the areas well-ventilated to help with drying and to get rid of any fumes from the cleaning products.
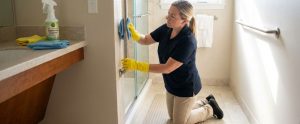
Step 4: Cleaning Windows, Mirrors, and Glass Surfaces
Cleaning windows, mirrors, and glass surfaces is the last step to make your space shine. Start by getting rid of any stickers or sticky spots on the glass. You can use a scraper or a razor blade for this. Just be careful not to scratch the glass.
Next, spray the glass with glass cleaner or a mix of vinegar and water. Then, take a clean microfiber cloth or a squeegee. Wipe the glass from top to bottom to get a clear, streak-free look.
When cleaning mirrors, use a soft, lint-free cloth to prevent leaving fibers behind. Once you finish cleaning the glass areas, dry any extra liquid around the edges. Now, take a moment to enjoy how clear your windows and mirrors are.
Conclusion
In conclusion, post-construction cleaning is very important for a safe and healthy place. You can do it yourself or hire experts like Cleenora Maids, but making sure to clean thoroughly after a construction job is key. Don’t forget to get the right tools and be safe. By having a clear plan for cleaning each part of your space, you can get rid of debris and keep everything clean. If you want to learn more, you can visit our blog for tips on Post-Party Cleanup.
Frequently Asked Questions
What is the best approach to dust removal after construction?
For effective dust removal during a renovation, start by using a strong vacuum cleaner with a HEPA filter. This will help collect fine dust from all surfaces, fixtures, and appliances. After that, use damp microfiber cloths to catch any leftover dust.
How do you ensure safety during post-construction cleaning, especially with debris and hazardous materials present?
- Always put safety first.
- Wear the right protective gear, like gloves, goggles, and masks.
- This helps keep you safe from debris and dust.
- Be careful when handling dangerous materials.
- Make sure there is good ventilation.
- Dispose of waste responsibly.
What are the common challenges faced by professionals in post-construction cleaning, and how can they be overcome?
- Professionals have challenges with hidden debris, tight deadlines, and different site conditions.
- To overcome these issues, it is important to do careful inspections.
- Efficient scheduling is also necessary.
- Clear communication with contractors helps a lot.
- Having backup plans is key to finishing the project on time.